The question is, has the option really been removed and is there really no way to make Word go full screen on your computer? Luckily, there’s still a way. Even though the option has been removed from the Word interface, the feature somehow still seems to exist and lets you use the old full-screen layout of Word. Since it’s hidden from the main options, you’re going to have to find a way to enable it and add it to a menu from where you can easily access it. There are actually multiple ways to activate full-screen mode in newer versions of Microsoft Word.
Use a Keyboard Shortcut To View Word Full Screen
One of the quickest and easiest ways to make your latest version of Word go full screen is to use a keyboard shortcut. Although the option has been removed from the interface, the keyboard shortcut for it continues to work and does the exact task it’s supposed to do. While you’re viewing a document in the normal mode and you want to make it full-screen, simply press the Alt + V keys at the same time on your keyboard. Then immediately press the U button on your keyboard and your document takes up your entire screen. When you want to return to the normal mode, press the Esc key and you’ll be back to where you were.
Enable Word Full Screen From The Quick Access Toolbar
You may have noticed that there’s a small toolbar at the very top of your Word screen. It’s called the Quick Access toolbar, and as the name suggests, it lets you quickly access some of Word’s features on your machine. You can actually use the toolbar to make Word full screen. There’s a command that you can add to the toolbar which then when clicked, opens your document in full-screen mode.
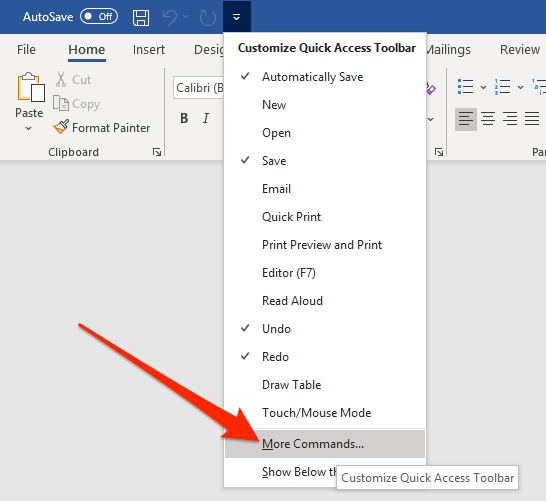
Click on the small down-arrow icon in the Quick Access toolbar and a menu will open on your screen. Select the option that says More Commands from this newly opened menu.
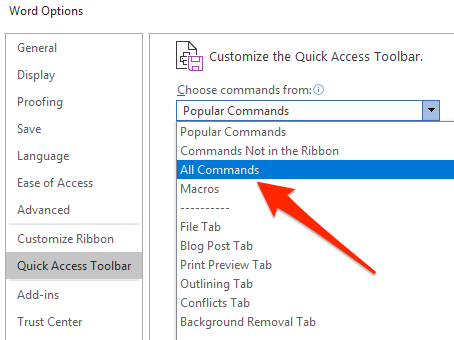
The following screen lists the commands you can add to the toolbar but it doesn’t show all the commands by default. To make it show all available commands, select All Commands from the Choose commands from the dropdown menu.
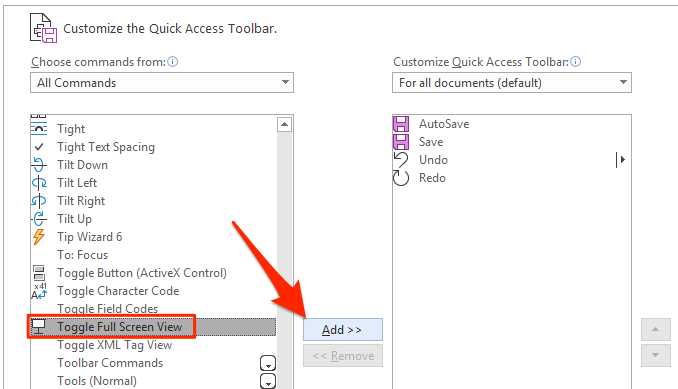
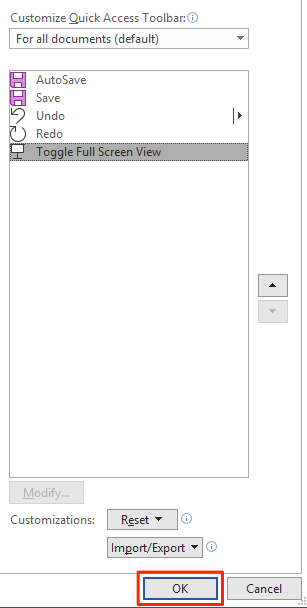
When all the commands are shown on your screen, look for the command that says Toggle Full Screen View. Click on it to select it and then click on the Add button to add the command to your toolbar.
When it’s added to your toolbar, you’ll see it in the right-hand side commands list. Click on the OK button at the bottom to save your changes.
You’ll now find a new icon appearing in your Quick Access toolbar. Click on the icon and it’ll open your current document in full-screen mode.
When you want to exit full-screen, just press Esc on your keyboard.
The icon for full-screen mode will continue to be there in your toolbar for all of your documents. If you ever want to remove it, you can do so by opening the pane you used to add the command, selecting the command in the right-hand side pane, and clicking Remove.
Make Word Full Screen Using The Read Mode
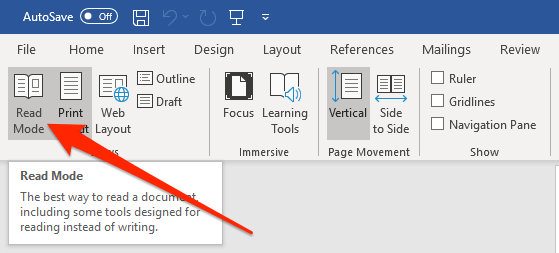
The Word full screen reading view may not be exactly a full-screen solution for your documents but it does the job to some extent. It hides many of your formatting toolbars and other items from your screen letting you focus on the document on your screen. You are going to see some of the options at the top, though, which can’t be removed in this mode. To access the read mode in MS Word, click on the View menu while your document is open and select the Read Mode option. To switch back to the normal mode, press the Esc key on your keyboard. You’ll be back to the normal editing screen with all the toolbars on it.
Create a Customizable Keyboard Shortcut For Word Full Screen Mode
If you don’t want to use the default keyboard shortcut for Word full screen mode and you’d rather create your own, you can do so by using Macro in Word. A Macro is a set of actions that are performed when you trigger the macro. You don’t really need to know much about it to be able to create a full-screen shortcut for Word, though.
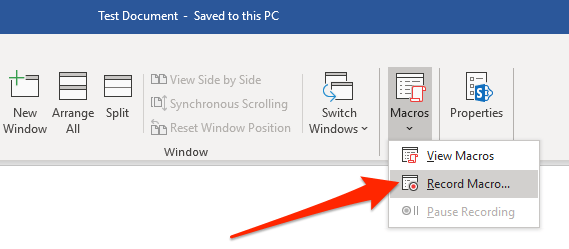
Open your document in MS Word, click on the View tab at the top, click on the down-arrow icon under Macros, and select Record Macro.
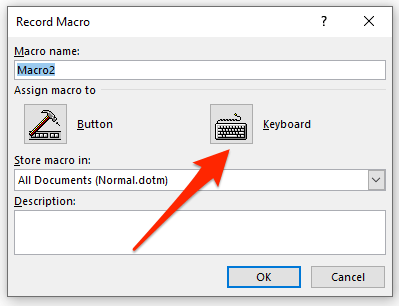
Enter any value in the Macro name field. Then click on Keyboard in the Assign macro to section so you can assign a keyboard shortcut to your macro.
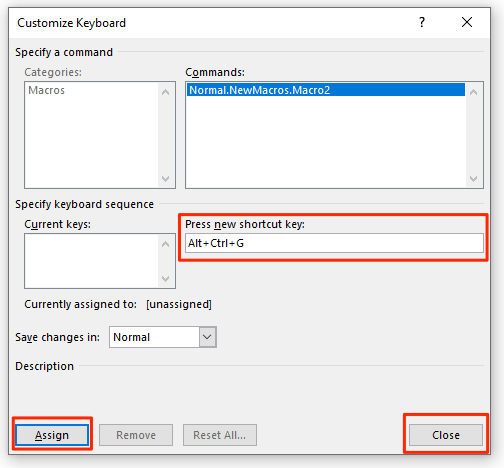
Once you click on Keyboard, you’ll see a new dialog box on your screen. Put your cursor in the Press new shortcut key field and press the keyboard shortcut that you want to assign to the full-screen mode. Click on Assign followed by Close to save your changes.
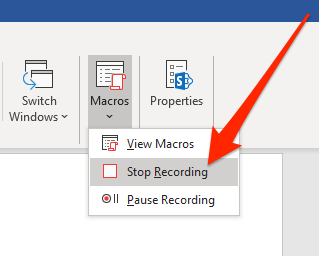
Press Alt + V on your keyboard. Then click on the down-arrow icon in the Macros option in your toolbar and select Stop Recording.
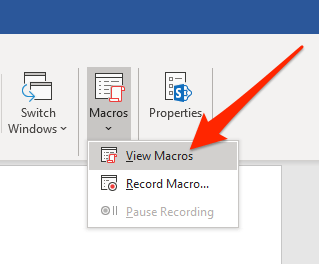
Click on the Macros down-arrow again and select View Macros.
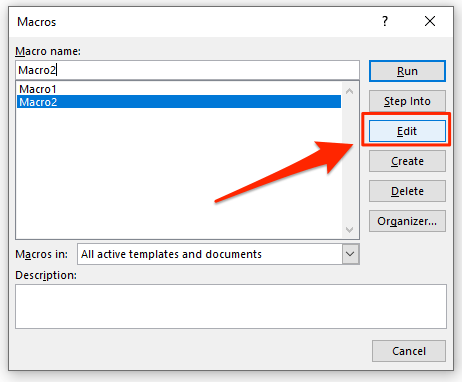
Choose your macro in the list and click the Edit button.
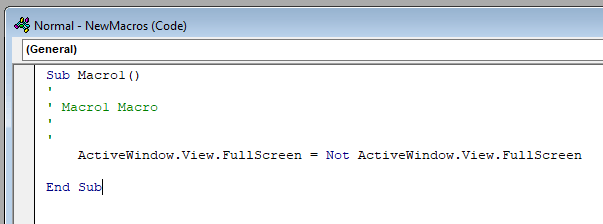
Make sure your macro only contains the following code. You can copy and paste the following code in your macro if you want. Hit Ctrl + S to save changes.
From now on, whenever you press your custom keyboard shortcut in Word, it’ll launch your document in full-screen mode.

![]()
